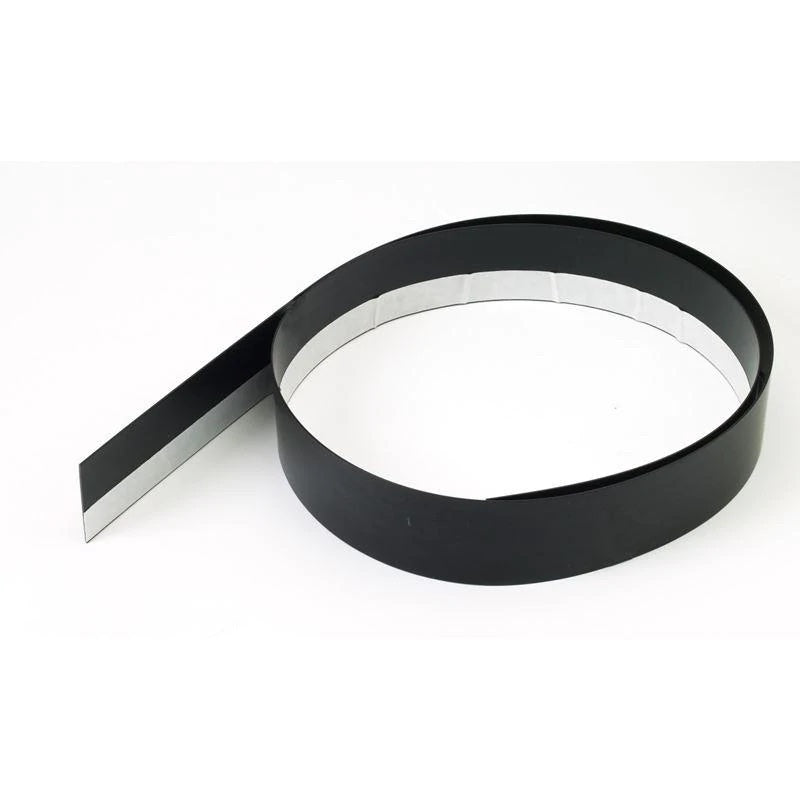
Z CounterForm Under-mount Sink Opening (8 feet)

About
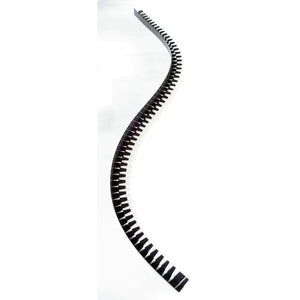
These 8 foot long, self-adhering flexible forms work with most undermount sinks.
Sink openings must be vertical and have curved inside corners. The sink forms can be softened with a heat gun to accomdate tight radius corners. However, if your sink has 90º corners you'll need to cut the form into sections and seam with duct tape to ensure proper fit and appearance. Some double bowl sinks may require the form be notched with a utility knife to bridge the divider.
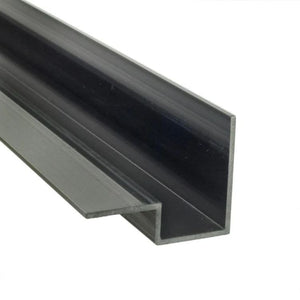
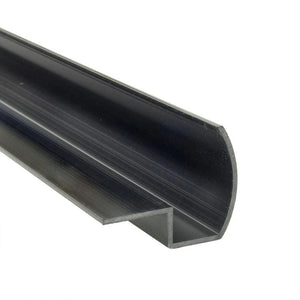
Z Counterform Concrete Countertop Forming System is the easiest way to pour cast-in-place concrete countertops. To use, place 1/2" cement board (Durock or Hardie Backer) on top of the cabinets. The cement board should be cut flush to the edge of the cabinets and held in place with silicon caulking. The forms will then be screwed into the cement board with a 5/8" x #10 panhead screw . After the concrete is poured, the forms are snapped off along the designated "break point" to reveal a beautiful clean edge.
Instructions
Forming
- Cutting Cement Board - Measure and cut 1/2" cement board so it sits flush with the top of the cabinets. The most commonly used cement board which we recommend is either HardieBacker board or Durock . The cement board should be held in place on top of the cabinets with a few dabs of silicone caulking.
- Cutting and Attaching Forms - Forms should be cut with a miter saw. Along the edge on every corner (both inside and outside corners) use roughly a 3" piece of edge form placed on the cement board and scribe a line where the nailer flange meets the cement board so two lines create an intersection. On inside corners, the lines will need to be extended until they intersect. Where these lines intersect, is the point you will measure and cut the forms to. Please see our video titled "Full Instructional Video (Old Version)" for more detail on this. Forms should then be screwed into place with a #10 x 5/8" panhead screw . Pre-drill the forms so you do not strip the cement board. Be careful not to over tighten screws as this will strip the cement board.
- Form Sink Opening
- Undermount - If you are installing an undermount, the easiest method will be to use our undermount
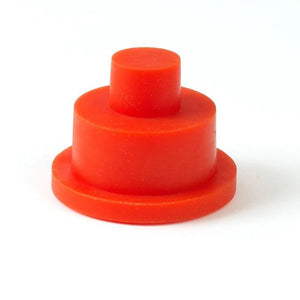
sink form . An installation video can be found on the product page . Your sink will have to have vertical walls for this form to work. If this is not the case, you will most likely have to create a knockout. This is most commonly done with dense form insulation board. To create the opening for the faucet holes, you will use our rubber knockouts. - Top Mount - The opening for a top mount sink can easily be formed using the backwall form that is included in the standard form packages. We find it easiest to not cut the sink opening in the cement board until after the concrete has been poured. Once the countertop is finished the cement board can be cut out with a keyhole saw and the sink will be dropped into hole.
- Apron Front Sink - For an apron front sink, the easiest way, is to use the profile form around the three edges of the sink. You do want to make sure that when you set the height of your sink, it is 1/8" - 1/4" lower than the top of the cabinet. The sink will not be in place when you pour the countertop. Once the forms have been removed, you can slide the sink in under the countertop overhang and caulk around the sink. You can see an example of this in the photo below. Reinforcement There are several valid ways to reinforce the concrete but one of the easiest methods is with our CX Basalt Scrim which can be held held in place with Z Clips. Other common types of reinforcement are 6x6 welded wire mesh or small rebar. If using rebar, make sure it is low enough in the concrete to prevent ghosting.
Special Form Techniques
- Overhangs -You can do up to a 12" overhang without any additional support or reinforcement. All you will do is let your cement board overhang the cabinets. Remember the form will add another 1-1/2" of overhang. You will need to temporarily support the cement board so it does not flex or sag under the weight of the wet concrete. To do this, we will usually use 2x4 legs placed every 24" along the overhang. They should stay in for 2-3 days while the concrete sets up. The cement board will stay in place as the drop down in the forms will completely cover it. If you wish to do a larger overhang, you will most likely want to use extra rebar reinforcement or an exterior brace.
- Bending Forms - You can bend the forms by cutting relief V notches in them but how much you can bend them depends on the profile you choose. The more decorative profiles will start to deform as you bend them too far. The Square edge can bend to any radius and the Half Bullnose and Fancy will also bend pretty well. To see how to cut the forms you can watch our short video titled How to Bend the Square Edge Form. We also sell a pre-cut Bendable Square Edge Form .
- Sample Piece - It is highly recommended to make a sample piece if it is your first time pouring a concrete countertop. Even if working with concrete in the past, a hard steel trowel finish and countertop mixes may be new. The easiest way would be to form up a small 2' x 2' mold using lumber. If you are going to have left over Z Counterforms, you may prefer to use these. This will not need any reinforcement but it is advised to use the exact mix (and integral color) that you plan to use for the actual pour. This will allow you to get a feel for the mix design and practice your finishing to make sure you are happy with the results. If you will be staining, it will give you a great place to practice and test out colors. If anything goes wrong or you are not happy with the results, we would be glad to help correct any issues.
Concrete
- Choosing Concrete Mix - There are many things to consider when choosing the concrete mix to use for your project. For a countertop, the most important features are normally strength and crack resistance. Cracking in concrete can happen for many reasons, but by picking a strong mix with low shrinkage, using a reliable reinforcement, and pouring on a solid base you will minimize the risk of excessive cracking will be the best ways to prevent your top from ever having issues. One great option, especially if looking for white, is Surecrete's Procast Concrete Mix.
- Mixing Concrete - Depending on the concrete, the mixing instructions may vary. If you are using one of our admixes or our concrete mix, please refer to the instructions on the back of the product packaging or in the technical data sheet found on the product pages.
- Placing Concrete - Once concrete is mixed to desired consistency, you will pour it into the form. Always start at one end of the countertop and work towards the other so that you keep a wet edge. As you place the concrete, you will screed it off to make sure it is level and flat with the top of the form. As you move, you will want to go back and check previous sections to make sure the concrete is still full to the top and you do not have any dips. It is important to vibrate or tap on the edge to aggitate it. This will help remove trapped air that will cause pinholes or larger voids in your edge. If you do get voids or pinholes in the edge, they can easily be fixed by filling them with Surecrete Xtreme Series Concrete Countertop Slurry Compound.
Finishing Concrete
- Magnesium Float -Once an initial set is recognized you may begin to trowel concrete with a magnesium float . In a controlled temperature and humidity this will most likely be 30 minutes to 1 hour after the concrete is placed. Light to moderate pressure should be used to achieve a nice and level preliminary finish. Be careful not to drag or pull concrete out of place. The magnesium float will help pull a cream to the surface which is what you should be looking for. It will leave the surface with a porous texture. This is key to allow air and water to continue to escape from the concrete as it cures.
- Steel Trowel - Once all bleed water has evaporated and the concrete is very firm, you will use a steel trowel for the final finish. Again, the amount of time will vary significantly depending on several factors, but will most likely be around the 2-4 hour mark. Steel troweling too soon will trap moisture in the concrete and leave you with a soft, dusty finish when the concrete cures. You can test the concrete by lightly pressing down with your finger. A light touch should not leave a finger print nor will wet concrete stick to your finger. A very firm press will leave a slight indentation. At this point, use the steel trowel with moderate to firm pressure to smooth the concrete to a slick surface. Once finish is satisfactory, let concrete cure for 48 hours before removing forms or sanding.
- Sanding/ Polishing - After 48 hours, the forms may be snapped off and you can begin sanding or polishing.
- Sanding - It is always a good idea to lightly sand the concrete before proceeding to staining or sealing. This will help open up the concrete and can be used to remove any minor burrs or imperfections. If you have some rough areas or deep trowel marks, you may want to begin with sand paper as low as 60-80 grit on an orbital palm sander. You will want to work your way up to 220-320 grit. Alpha Diamond Hand Polishing Pad can also be used to touch up burrs, knock down sharp edges and corners, and remove any excess concrete that may be left behind where the forms were seamed.
- Polishing - Polishing concrete is a process that normally uses a Wet Polisher and Diamond Polishing Pads to grind away the top surface of the concrete (often to expose a decorative aggregate) and bring the surface to a highly polished finish similar to granite. This is not a necessary process unless it is the look you desire.
Coloring
There are several ways to color concrete depending on your preference. The three options we offer are detailed below. We always recommend making sample pieces to experiment with colors.
- Integral Pigments - Integral coloring is when you add a colored powder like our SmartColor pigments into the concrete while mixing. This is a popular choice for coloring in decorative concrete. It should be used when looking for a more uniform color. Integral pigments are usually UV stable and safe for outdoor use. The color intensity will vary depending on how much color is added. Typically, integral pigments are more buff or earth tone colors and not used for creating bright vibrant colors. Many factors can affect the final outcome so making a sample is always advised.
- Staining - Surecrete Eco Stain is safe for indoor or outdoor use, but should not be used over polished or tightly finished concrete. Staining will give you some really great faux finishes and can be mixed with other colors, diluted, or overlaid to create a wide spectrum of colors and effects. It can be applied by brush, roller, sponge, rag or spray bottle to give different effects as well.
Sealing
Sealing your concrete countertop should be the final step. It will ensure a durable, stain free finish that will last a long time. The following list includes some of our favorite options:
- Application - The application will always differ depending on the sealer you choose. It is important to read the directions first and make sure you have a good understanding of the recommended application instructions. Also, testing the sealer in a small inconspicuous area will allow you to make sure you like the final look.
- Maintenance - Again, this will vary depending on the sealer you choose. Some may require reapplication every year where other may be fine for several years. To clean your countertops that were sealed with any of our sealers, you should use soap and water or house hold surface cleaners with a sponge, rag or paper towel. We love Interstar Concrete and Granite Countertop Cleaner. Avoid using citrus cleaners or any abrasive scrubbing pads.